Introduction

This is the user manual for the Pilot Gear Watch (PgW) Logbook App.

Identification

Version

This is the version 1.0 of this manual.

Change log

 
Version Date of issue Highlights
1.0 Oct. 15th, 2020 Creation of the manual

Repository

Before logging your flights, this application requires several items to be created in the repository. These items are :

  • Your past experience
  • Aircraft
  • Private specific airfields
  • Time settings

This section explains what you have to do and how this data is used in the application.

Enter my past experience

When you start with this application, it is recommended to log the flights you did during the 12 months before the current date. For all the preceding flights, just enter the figures for each statistic item in the past experience page.

All the statistic items are presented in the section The statistics.

Values are set for one category. The application manages 5 categories. Tap the category name displayed on the top of the list to change the category.

Categories are presented in the section Aircraft class.

To change an item, just tap on it in the list. It will open a small input dialog where you can enter the value.

Values are recorded instantly.

Finally, the application can check the consistency of the values. Tap the bottom right button to run the verification process. If errors are detected, they will be listed in a dialog window as shown here. Otherwise, a small message will appear at the bottom of the page to confirm that the values are correct.

The verification performed is :

  • Day + Night shall be equal to Total
  • Captain + Dual shall be equal to Total
  • IFR + VFR shall be equal to Total
  • Single Engine + Multi-Engine shall be equal to Total
  • IFR shall be equal to IR-SE + IR-ME
  • VFR shall be equal to VFR(SE) + VFR(ME)

The values of your past experience are taken into account in the statistics pages as flights done more than 12 months ago.

Manage aircraft

Each flight must be attached to an aircraft. Aircraft are selected through a predefined list. This list is created and maintained in the repository of the application.

To access the repository, press the SETUP button on the homepage of the application (see screenshot)

In the setup page, enter the Aircraft section by tapping the title “Aircraft”

The Aircraft repository is a list with the aircraft number, class and description. A small picture can be added to see the aircraft itself.

Each aircraft has a color. This color is used in the statistics charts (See charts section). It is important to select good colors to make nice charts later.

To add a new aircraft, just tap the button on the bottom right of the page.

To edit an aircraft, just tap its view in the list.

To delete an aircraft, just tap the “Trash bin” button on the right of the aircraft view.

When you delete an aircraft, the aircraft ID is preserved on every of its flights. If you have deleted the aircraft by error, you can recreate it manually with the same ID. The link with the flights won’t be broken.

The aircraft form contains the following fields:

  • Aircraft ID (mandatory)
  • Description
  • Class
  • Flight Simulation Training Device flag (set to true if the aircraft is a FSTD)
  • Color (used in the charts)
  • Picture (select a picture stored in your phone or directly take a picture with the camera)

You must tap the bottom right button to save your data. If you tap the back button, the input will be lost.

The aircraft pictures you have chosen are copied in a dedicated folder in your phone. The folder name is “AircraftPictures”. So if you delete the picture from your original gallery, the picture will still be available in the application until you delete the copy which has been created.

Aircraft class

This application supports different classes of aircraft. You can log in the same logbook flights with any class of aircraft. Classes are grouped by category. Categories and classes are listed in the table below.

CategoryClass
GliderGlider
Touring Motor Glider (TMG)
AirplaneSEP-land
MEP-land
SEP-sea
MEP-sea
SET
UltralightUltralight
GyroplaneGyroplane
HelicopterHelicopter

Time computations will always be available for a given category at a time so you won’t, for example, mix the hours of flight with a glider with the hours of flight with an airplane.

Manage your airfields

The application is provided with its own airfield database. It contains all the airports of the major countries having an ICAO code (4 letters code). If your airfield is not in this database, you can define it manually in the repository of the application.

To access the repository, press the SETUP button on the homepage of the application (see screenshot)

In the setup page, enter the Airport section by tapping the title “Airports”

It is very easy to create new airfield. To add a new one, just tap the bottom right button. On the airport form, place a marker on the map to set the location of the airfield. Give it a name then confirm your input with the bottom right button. That’s it !

All your specific airports are displayed on a single map in the airport repository page.

On this page you can edit or delete the airports.

Warning! When you delete an airport, the location is lost. The flights related to this airport will be preserved in your logbook (with the airport ID) but the application won’t be able to display the flights on the map.

Manage your options for time management

Two more options can be defined in the SETUP page before logging the flights:

  • The civil twilight offset,
  • The UTC mode,
  • The use of decimals for hours

The application computes automatically the day/night hours by using the sunrise and sunset times at the airports. These options are important. You may have incorrect results if you set UTC mode but enter your flight times in local time mode.

When decimals are used for hours, always use the symbol “.” (dot) for the decimal.

Flights

To log a flight, enter the logbook (tap the LOG button on the homepage) and then tap the floating button at the bottom right of the logbook page.

The flight form is composed of 3 sections:

  • Main section with departure and arrival data
  • Crew section with the Captain name, the tags and the description
  • Aircraft section

The mandatory fields are:

  • The flight date,
  • The departure airport,
  • The departure time,
  • The arrival airport,
  • The arrival time

All the other fields are optional. Some of them are calculated by the application (but can be modified manually too) :

  • Day time
  • Night time

These values are computed using the sunrise and sunset times at the departure airport and arrival airport. See the time management options to configure this feature.

Always use the “YYYY-MM-DD” format to enter the flight date manually. A calendar pop-up is also available to enter a date.

Warning! Always tap the bottom right button to confirm your input. If you press the back button, your input will be lost.

When a flight is logged, you can edit the flight data at any time. All the data can be modified except :

  • The flight date,
  • The time of departure

If you entered incorrect values in these fields, you will have to delete the flight and recreate it.

Use tags

Tags is a very efficient way to associate your flight to predefined keywords. These keywords can be used in the logbook to find very quickly your flight or to create specific charts.

To create tags, just enter a new keyword in the tag input field “Add Tag”. When you tap outside the tag, the new keyword is confirmed. It becomes green.

When you type in the input field, a dropdown list will suggest you the existing tags starting with the letters you wrote. Just tap one of the keyword in the list to use the existing tag.

To remove a tag, just tap once on it then tap again on the cross symbol. The tag will disappear.

See the section “Tags” for more information about tags.

Airport information

Airport fields have an auto-completion feature. Airports known by the application will be listed as you type the airport code in these fields. If your airport is not listed, you can still log your flight but it may not be displayed properly on the maps. To define the location of your airport, please go to the airport repository by tapping the small “Tower” button and create your airport. See the section for airfields management for more information.

The application has its own airports database. It contains the main airports having an ICAO identification code (4 letters) of many countries around the world.

You can have detailed information about an airport known by the application by tapping the “information” button. It will open the website https://skyvector.com on the corresponding airport information page.

This feature may not work for the personal airports you will define in the repository of the application.

Aircraft information

Aircraft must be selected from the aircraft repository. If your aircraft is not defined in the repository of the application, tap the first button named “NEW” (with a yellow background). It will open the aircraft data form to create a new aircraft in your repository.

Glider specific information

When you select a glider, an additional field appears below the take-off/landing table: launch mode.

You can select one of the 4 launch modes:

  • Autonomous (TMG)
  • Aerotow
  • Winch
  • Bungees

These values are used to compute dedicated statistics items.

The logbook

Category

If you fly on different types of aircraft (glider, airplane, etc…) you can log all your flights in the application without any problem. The application will detect that you have multiple categories of aircraft in your logbook (see the categories in the section about Aircraft repository) and ask you to select the category you want to see. You can choose either to see one category or all categories.

Once a category is selected, you will only see the flights logged for this category. Statistics (see the section Statistics) will also be computed based on the flights of this category.

The current active category is displayed on the top of the logbook page. Tap its name to change the category.

The application will ask you to select a category every time you enter the logbook page. The selection you make also affects the statistics.

Note that you can log a new flight for any category. For example, if you have selected the category “Airplane”, you can still log a flight with a glider.

List of flights

The logbook opens when you tap the LOG button on the homepage.

The logbook has 2 display modes:
  • List
  • Map

The list mode is shown on the screenshot you see on the left.

You can change the mode at anytime by tapping one of the 2 buttons on the top of the window.

Groups

On both modes, flights are grouped. 5 types of groups are available:

  • Group by year
  • Group by month
  • Group by Aircraft/Year
  • Group by Tag
  • Group by Aircraft Class

Groups are shown as tabs over the list or the map. Open a group by tapping the corresponding tab. If they are a lot of tabs, use your finger to scroll the tabs to the left or to the right.

You select the group type by tapping the upper right menu. See below, the screenshots for the list mode. It works also in map mode.

Search flights

In every group type, you will have 2 additionnal tabs on the top of the list :

  • Search tab (see screenshot on the right)
  • All tab

The “All” tab shows all the flights.

The “Search” tab allows you to filter the flights (all of them) using one or more words (or fragment of words).

Type them in the criteria field. Separate them with space.

The words can be combined (all of them must match – switch set to ALL) or not (only one of them must match – switch set to ONE).

Tap the button “Search” to filter the list.

List mode

In list mode, you can read directly the following information:

  • The flight date,
  • The departure (airport and time),
  • The arrival (airport and time),
  • The aircraft ID,
  • The flight rules (VFR or IFR)

If you rotate your smartphone in the landscape mode, you can also read :

  • The description,
  • The tags

The symbol shown between the departure and the arrival indicates the flight rules for this flight.

In addition, the symbol on the left indicates if you are PIC or in dual commands. The background color indicates if it is a night VFR flight or a day VFR flight.

Map mode

The map mode displays the flights of the group directly on an interactive map.

The departure and arrival locations are shown with a red marker. The flight is shown with a thin blue line.

You can zoom, rotate and scroll the map with your fingers.

You can also use the buttons at the bottom of the page to zoom in or zoom out or to reset the zoom and see all the flights of the group.

Tap any marker to focus on the flights related to this marker (the map will zoom in or out to show you all the flights connected to this marker).

Tap the same marker again to see the flight data page (see below). If more than one flight is connected to this marker, a selection dialog box will open and lists all the available flights for this marker. Tap on of them to open the flight data page.

Flight data page

Each flight is displayed with the flight data page. On this page, you can see :

  • The departure and arrival locations on a map,
  • The time of departure and the time of arrival,
  • The aircraft ID with its picture, its class and its description

You can open an additional information panel which shows the following:

  • the flight hours,
  • the number of landings and take-offs,
  • the flight captain name,
  • the flight description

by tapping the “Information” button at the bottom of the page.

Tap this same button to hide this panel.

By tapping the small aircraft picture on the top of the page, you can enlarge the picture. Tap anywhere to hide the big picture.

Finally, by tapping the floating button over the map (on the bottom right) you will open a small menu with 2 options :

  • Edit the flight data,
  • Delete the flight

Warning! There are no confirmations required to delete a flight at this stage. Once you tap the “Delete flight” button, the deletion is done.

The statistics

When your logbook is up-to-date, you can check your flight hours and create charts by entering the statistics part of the application. To enter this part, tap the STATS button on the homepage.

Values (Hours and charts) are computed for one category only at a time. The active category is displayed on the top of the statistics page. If you want to change the category, tap the category name and select a new one.

Flight hours

The statistics page shows a list of values computed using different periods:

  • The current month,
  • The last 3 months,
  • The current year,
  • The last 12 months,
  • All the flights

    The values are related to categories. The statistic items are:

    GliderAirplaneUltralightGyroplaneHelicopter
    the number of hours in VFR,XX
    the number of hours in IFR (simulated or not),XX
    the number of hours as a PIC,XXXXX
    the number of hours in dual command,XXXXX
    the number of hours at night,XX
    the number of hours at day,XX
    the total number of hours of flight,XXXXX
    the number of landings at day,XXXXX
    the number of landings at night,XX
    the number of take-offs at day,XXXXX
    the number of take-offs at night,XX
    the number of flights,XXXXX
    the number of hours with a single-engine aircraft,X
    the number of hours with a multi-engine aircraft,X
    the number of hours with a single-engine aircraft in VFR,X
    the number of hours with a multi-engine aircraft in VFR,X
    the number of hours in IFR simulator,XX
    the number of hours with a single-engine aircraft in IFR,X
    the number of hours with a multi-engine aircraft in IFRX

    The charts

    Tap on the top right button in the statistics page to enter the charts page.

    Manage your charts

    All your charts are listed in the charts page. They are displayed one after another. You can scroll the page up and down to see them.

    Tap the floating button at the bottom right of the charts page to create a new chart.

    To edit an existing chart, just tap the chart.

    To delete a chart, swipe the chart to the left or to the right and confirm its deletion.

    Create a chart

    To create a chart, the application offers multiple options:

    • type the chart name,
    • select the period of analysis and the granularity of your chart,
    • the type of chart,
    • the data you want to use
    All these options are detailed below. Every time you change an option, the chart is updated dynamically so you can see the result instantly. You can show/hide the options panel by tapping the upper right button (burger button).
    All these options can be modified at any time after the creation of the chart.

    Warning! Always tap the bottom right button to confirm your input. If you press the back button, your input will be lost.

    Period of analysis

    You can select 4 types of period :

    • All flights of the logbook,
    • All flights since a given date: you set the starting date,
    • A fixed length period from today : you set the number of months,
    • A fixed period in time : you set the starting and end dates

    Type of chart

    The application offers 4 types of charts :

    • Bars,
    • Lines,
    • Pie,
    • Radar

    For lines and bars charts, you have 2 more options :

    • Cumulative values : the value for one month/year is computed by summing all the preceding values and the value itself.
    • Stacked values : values of the series are displayed one over another. The Y coordinate of the point in the chart is the sum of all the values of the series for the same X value.

    With bars chart, when values are not stacked, bars for a given X value are displayed in parallel on separated bars.

    With lines chart, when values are not stacked, curves are displayed one over another.

    Data for the chart

    Finally, select the data you want to use to create the chart. You can select one type of data among 2 :

    • Hours
    • or Occurrences.

    You can select also the series among 4 types of series:

    • 2 series based on daylight : Day/Night
    • 2 series based on flight rules: VFR/IFR
    • Series based on aircraft of your repository
    • Series based on the tags you have defined in your flights
    • Series based on the aircraft class
    • Series based on glider launch mode

    For each type, you can show/hide any series by tapping the corresponding switch (see screenshot on the right)

    You can also combine the series with the years by setting the flag “Years as series” to ON. In this case, each series will be split into several sub-series (one per year).

    The colors of the series Aircraft and Tags are defined in the repository. See the repository section for Aircraft and Tags.

    Proficiency checks

    The application can check if your proficiency requirements are met, category by category. This chapter explains how to create requirements for your categories and how the application uses them.

    Create proficiency requirements

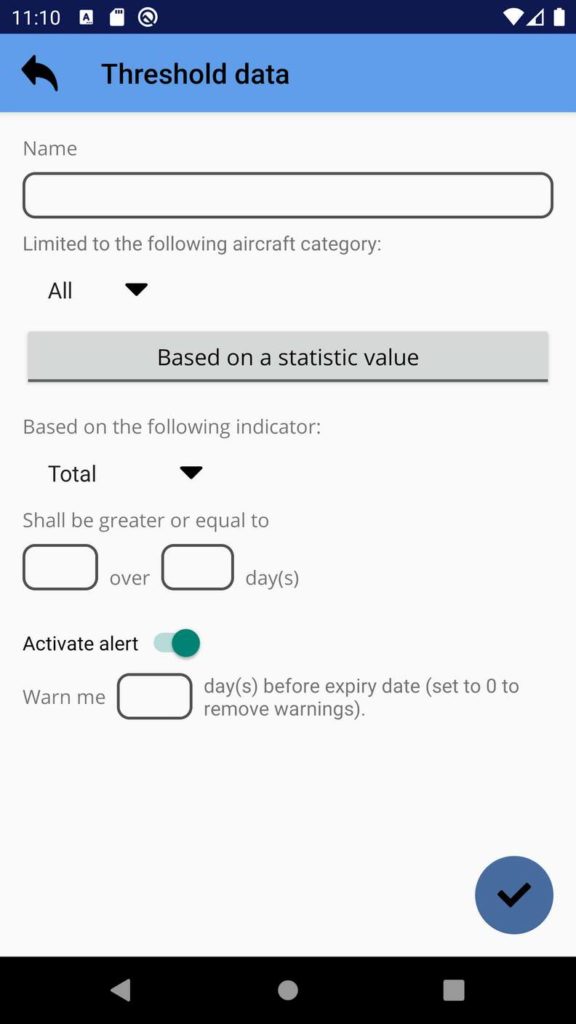
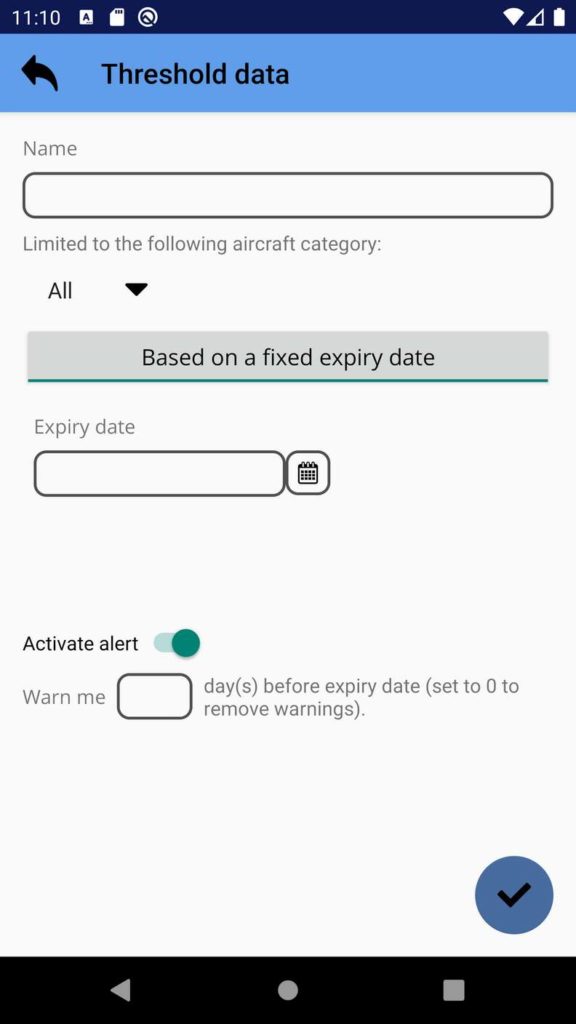
    You can define 2 types of requirements:

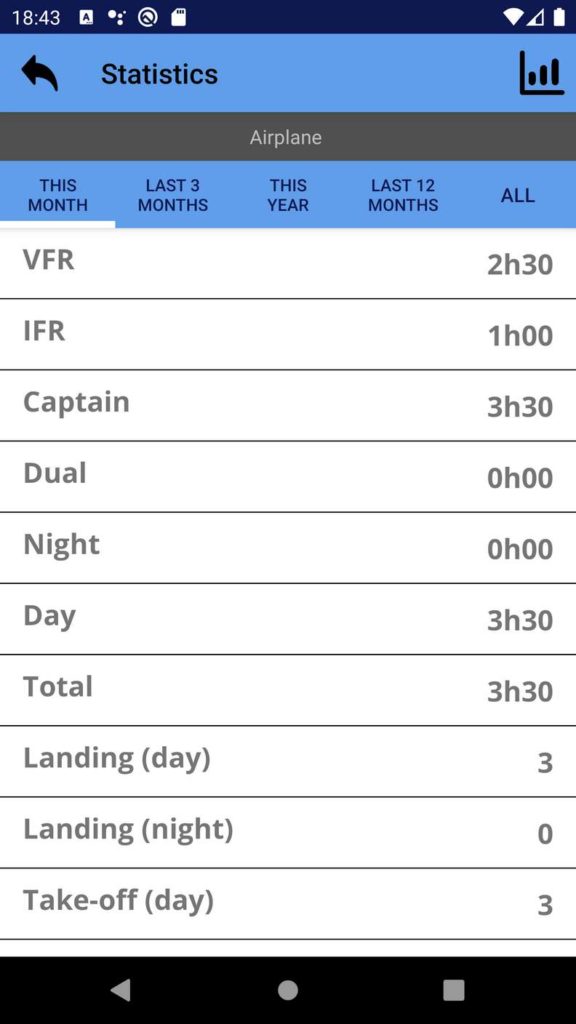
    • requirement based on a statistic item (number of hours of flights done in a month for example)
    • requirement based on an expiry date (Medical class certificate for example)

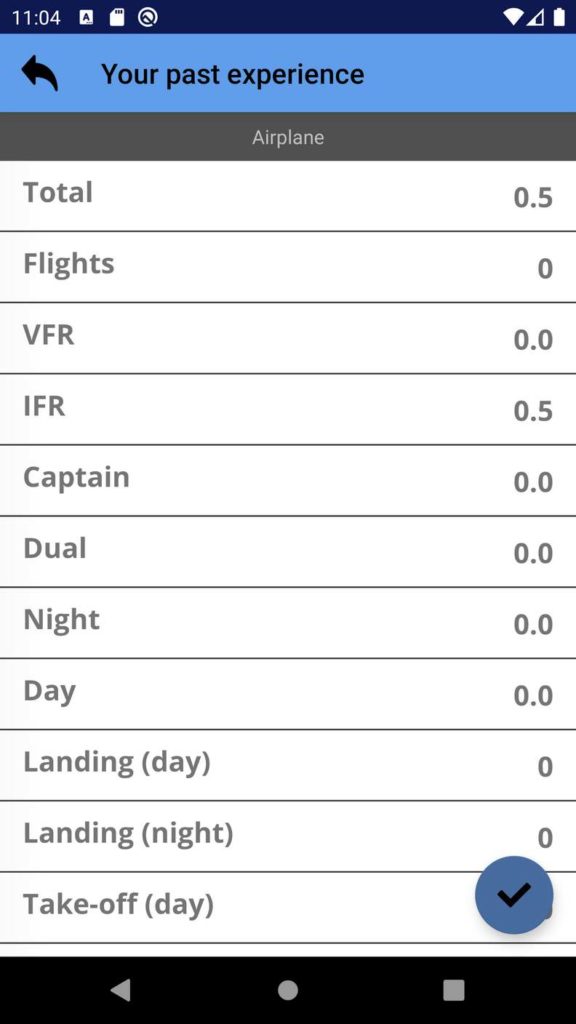
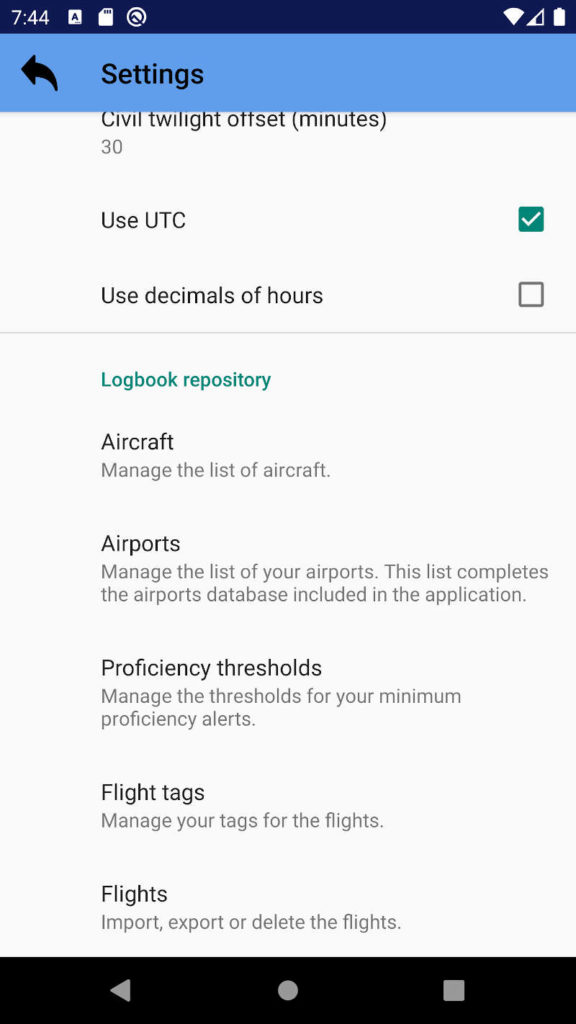
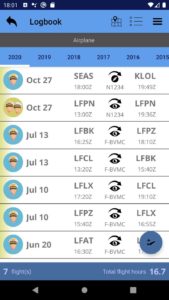
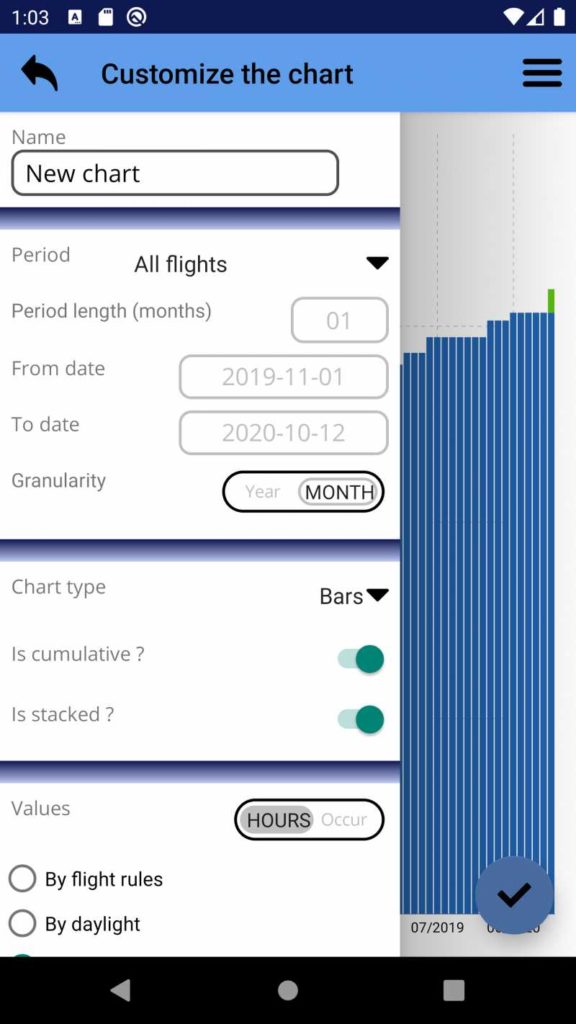
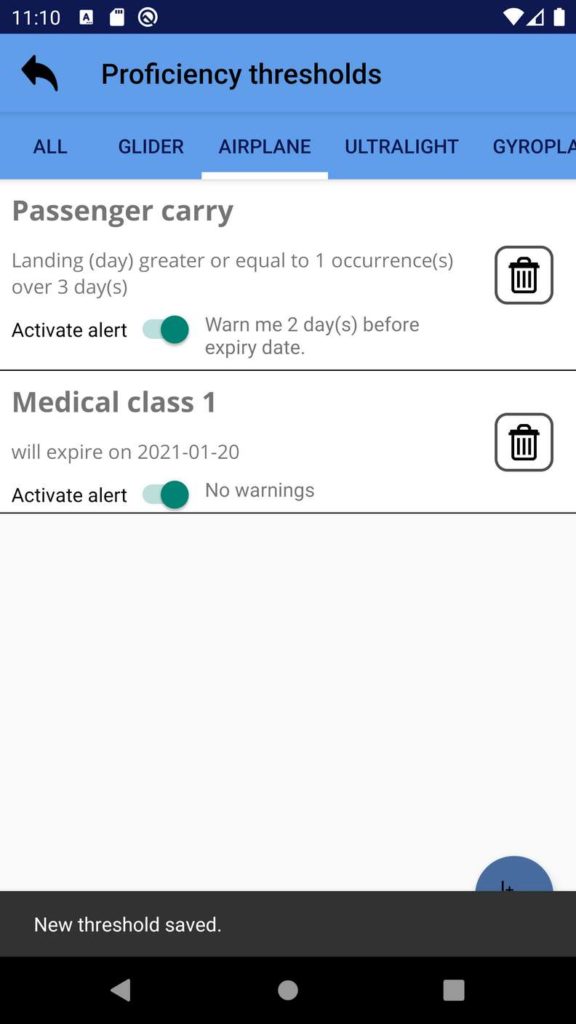
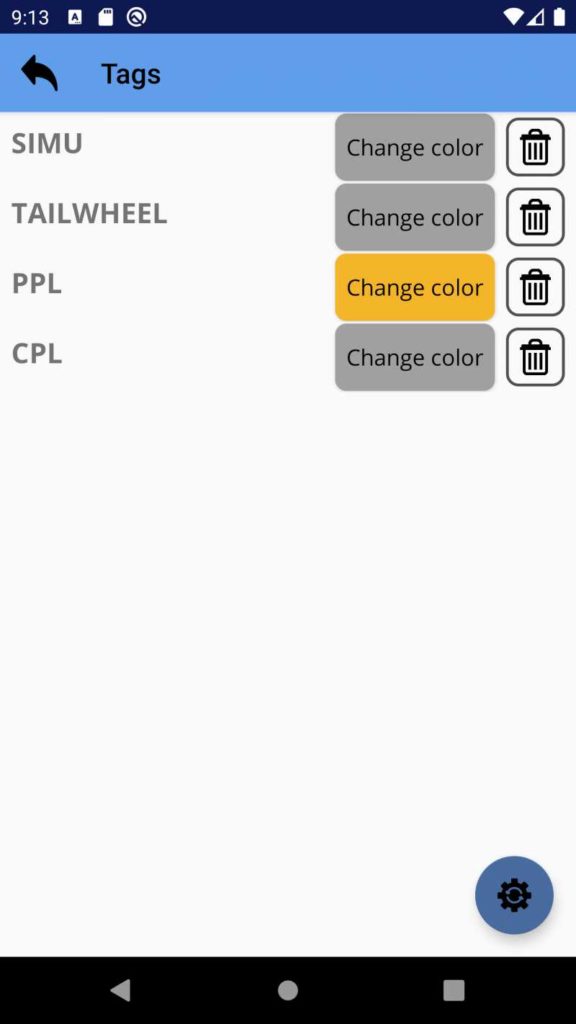
    Tap on the SETUP button on the homepage. Then select the “Proficiency thresholds” section of the preferences page. It will open a new page (see a screenshot on the right).

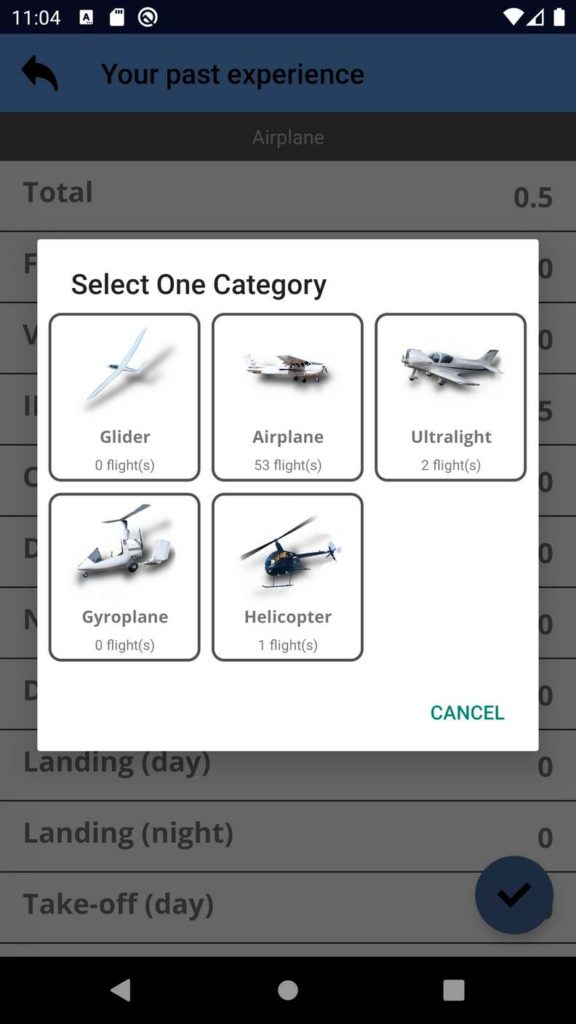
    On the top of this page, categories are listed. Tap one of them to see the requirements defined in this category.

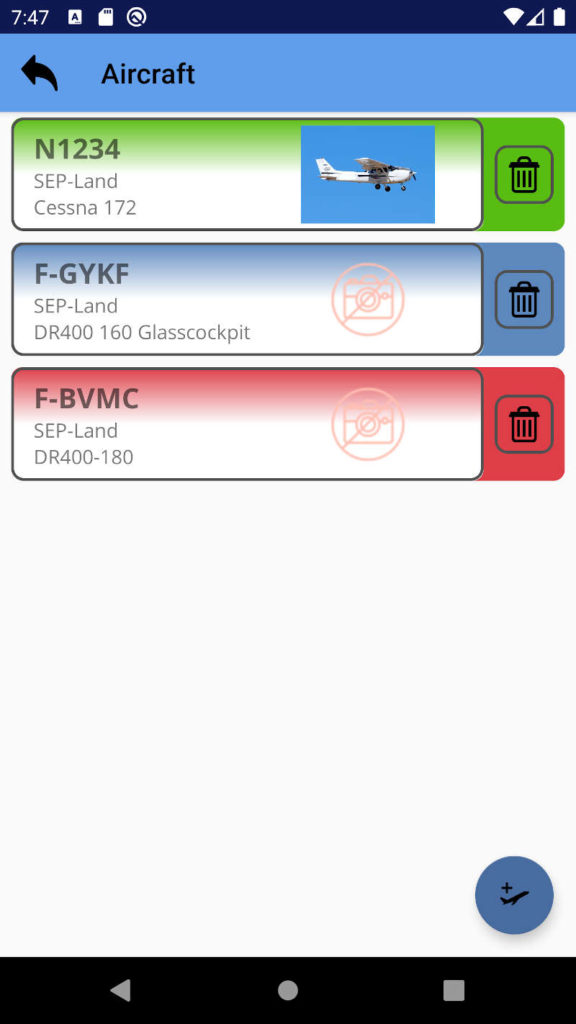
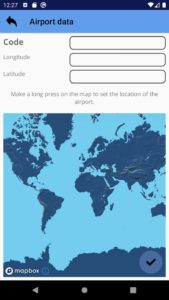
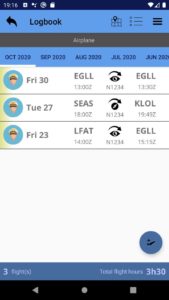
    At any time, you can tab the bottom right button to create a new threshold.

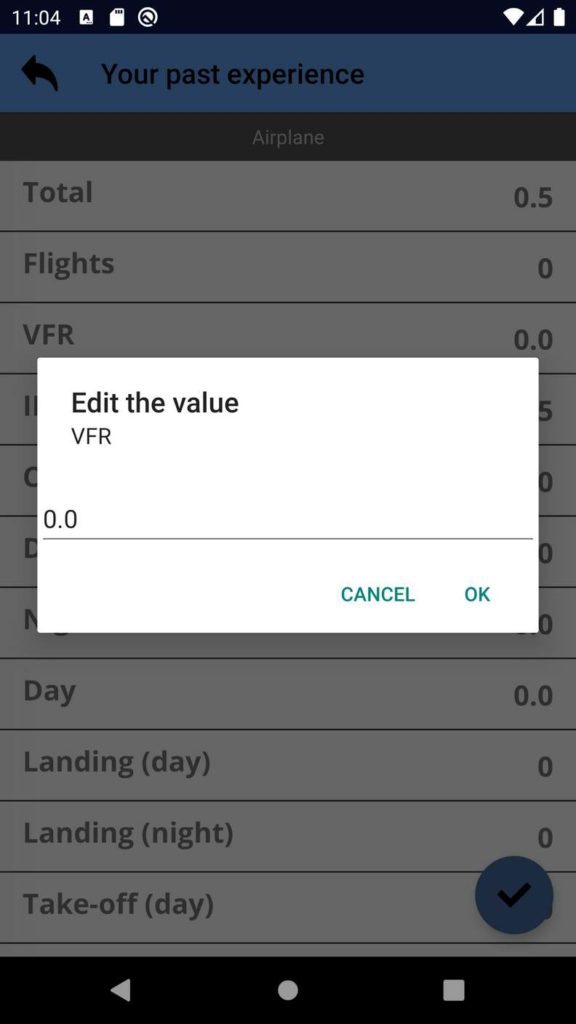
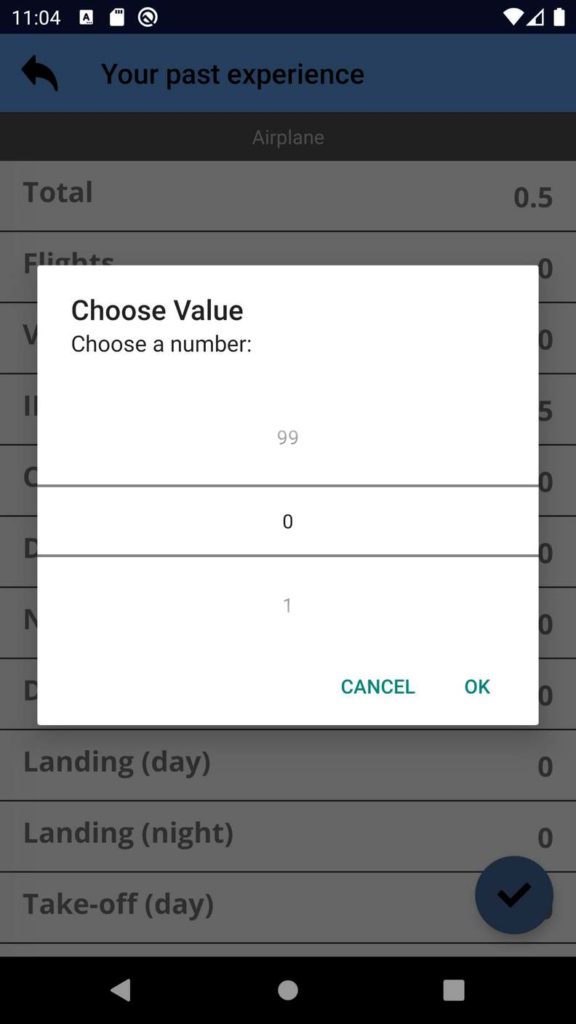
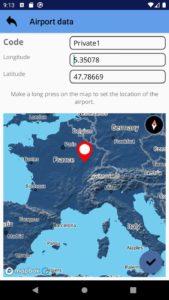
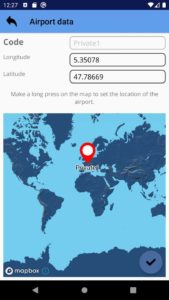
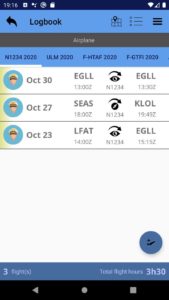
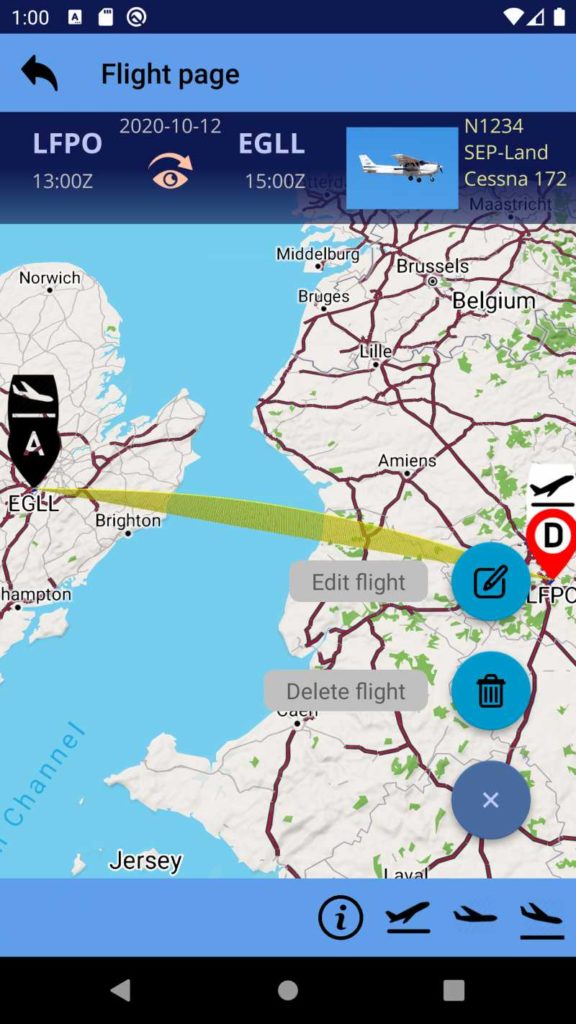
    You can also tap any threshold item to edit it (note that the name can’t be changed once it is created).

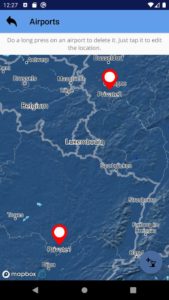
    Finally, tap the “Trash bin” button to delete a threshold.

    Select the type of requirement by tapping the large button just below the category field. When you tap it, it switches from “Based on a statistic value” to “Based on a fixed expiry date” and vice-versa.

    The other fields you have to fill change accordingly.

    A proficiency threshold based on a statistic value has multiple parameters:

    • A name. It will be displayed on the statistics page if an alert or a warning exists for that threshold.
    • A category of aircraft. The proficiency is checked only for flights done with the corresponding aircraft classes (See aircraft classes for the list of categories).
    • A statistic indicator. Its value is used to check the proficiency.
    • A minimum value for this statistic indicator.
    • A period of time (in days) to compute the statistic indicator and compare it with the minimum value.

    A proficiency threshold based on an expiry date has multiple parameters:

    • A name. It will be displayed on the statistics page if an alert or a warning exists for that threshold.
    • A category of aircraft. The proficiency is checked only for flights done with the corresponding aircraft classes (See aircraft classes for the list of categories).
    • An expiry date.

    Always use the “YYYY-MM-DD” format to enter the expiry date manually. A calendar pop-up is also available to enter a date.

    Alerts can be set for each requirement. To configure the alert, fill the two last fields of the form:

    • A flag to activate the alert feature. When set, an alert will be displayed when the minimum is not met.
    • When alert is active, you can also set a delay (in days) to be warn before the minimum is not met. The warning message will give you the date of expiry of your proficiency.

    Alerts on the homepage

    If at least one requirement is not satisfied or will be not satisfied in a near future, a popup dialog will be displayed on the homepage when the application starts.

    This dialog box will list all the requirements which are not satisfied (alerts) or will not be satisfied in a near future (warnings).

    The name of the threshold and the category it applies to are shown in the dialog box.

    For warnings, the expiry date will be shown too.

    Alerts on the statistics page

    If a requirement is not satisfied, its name is displayed in front of the statistic value concerned by the requirement. The background becomes red for that value.

    See the example on the right for the requirement “Night VFR requirement”.

    For requirements that are not satisfied in a near future, the name is displayed with the date of expiry. The background becomes orange for that value.

    Tags

    New tags are created by typing a new keyword in the TAG field of the flight data form.

    A tag is a single word, uppercase. Spaces are not allowed.

    Existing tags can be reused by typing the first letters in the TAG field and select the existing TAG in the autocompletion list.

    Every tag you use is also recorded in the application repository. Go to the repository, in the section “Flight tags” to see the list of active tags. In this page, you can set the color of the tag. The color has 2 benefits:

    • it helps when you use multiple tags on the same flight
    • it is used to color the charts based on tags

    You can also delete a tag and remove it from the flights.

    When you import flights from an external file (see section Import/Export for information about flights import), tags are not automatically added to your repository but they are still present in the flights data. If you want to activate them and give them a color, press the bottom right floating button.

    Import/Export flights

    This application doesn’t use web clouds. Your data remains on your smartphone or your tablet. No user accounts, no servers will be requested by Aerotools for the use of this application. But you can still share your data with multiple instances of the application. You can export your flights, personal airports and aircraft to a single XML file. The XML Schema of this file is provided in this manual.

    You can also import a XML file generated by another instance. The import will merge the existing data with the data available in the file : flights, airports and aircraft.

    If an item is identical between the file and your logbook, the data of the logbook for this item is preserved and the data of the file for this item is discarded.

    Finally, you can drop all the flights you have (and keep the airports and aircraft) by tapping the “red button” 🙂

    You can backup your data regularly by exporting it to an XML file. If you have to reset your phone or tablet one day, you could restore in few seconds all your logbook by importing a backup XML file.